
Complete Guide to Installing CrewNique Build on Kodi 20 Nexus and Kodi 19 Matrix
If you’re looking to enhance your Kodi experience with a fresh, appealing interface and a plethora of pre-installed video addons, the CrewNique build might be just what you need. This detailed tutorial will walk you through the steps to install CrewNique on both Kodi 20 Nexus and Kodi 19 Matrix. Although the screenshots are based on Windows 11, the process remains the same across various devices including FireStick (4K, 4K Max, and other models), Android TV, macOS, Windows 10, Raspberry Pi, iOS, and Android.

What is CrewNique Build?
CrewNique is a dynamic Kodi build that transforms the standard Kodi interface into a more visually engaging and user-friendly experience. This build not only refreshes the Kodi appearance but also integrates a variety of video addons for movies, TV shows, live TV, sports, and more. This means you might not need to install additional addons separately. buy 6 month subscription
Available through the Crew Repo, CrewNique is part of a well-regarded third-party repository known for its popular Crew addon.

Is CrewNique Safe and Legal?
Safety Considerations:
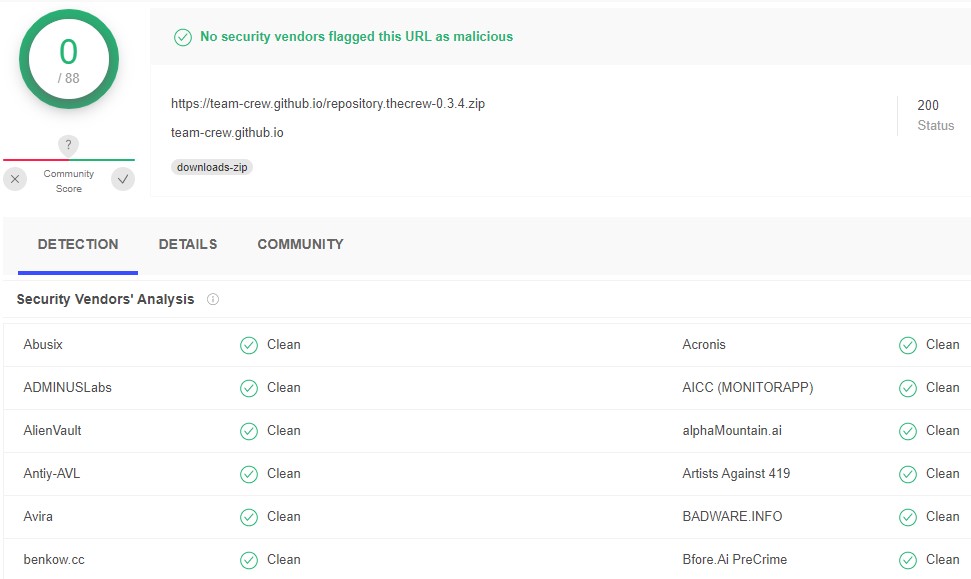
CrewNique comes from a third-party source, not Kodi’s official repository. While I’ve personally not encountered any issues and the repository scans clean on VirusTotal, absolute safety cannot be guaranteed.
Switch to IPTV
Legal Aspects:
Determining the legality of CrewNique can be challenging. FireStickTricks does not have the capacity to verify the legality of each build or addon thoroughly. Many addons included in CrewNique obtain streaming links from unverified sources, potentially lacking the necessary copyright or streaming rights.
For peace of mind and to protect your privacy, using a reliable VPN like ExpressVPN is highly recommended. A VPN will obscure your IP address and safeguard your online activities from prying eyes.
How to Install CrewNique Build on Kodi
Since CrewNique is not available in Kodi’s official repository, you’ll need to follow a series of steps to install it from its original source. Please follow each step carefully:
Legal Disclaimer:
This tutorial is for educational purposes only. FireStickTricks.com does not own, host, or distribute any streaming apps, addons, websites, IPTV services, or content. The site includes unverified services, and we cannot confirm their legal status. Users are responsible for the media they access.
Part 1: Enable Unknown Sources in Kodi
To install CrewNique, you must first enable Kodi to accept installations from unknown sources:
- Open Kodi and navigate to the home screen.
- Click on the cog icon (Settings) in the top-left corner.
- Go to “Add-ons” on the left-hand menu.
- Toggle the “Unknown Sources” option to ON. Confirm your choice if prompted.
You’ve now permitted Kodi to install addons from unknown sources.
How to setup IPTV on Smart TV via Smart IPTV App(SIPTV)?
Part 2: Add the Crew Repo Source Path and Install the Repository
Next, you’ll provide Kodi with the URL for the Crew Repository:
- Return to Kodi’s Settings window.
- Open “File Manager.”
- Select “Add Source.”
- Click “<None>” and enter the URL:
https://team-crew.github.io. Double-check for accuracy to avoid installation errors. Click OK. - Enter a name for the source (e.g., “Crew”) and click OK.
- Return to the Settings window by pressing the back button.
- Navigate to “Add-ons” and choose “Install from zip file.”
- Click “Crew” (or the name you chose) and select the zip file to install the Crew Repository.
- Wait for the repository installation notification.
Part 3: Install CrewNique Build
Now, use the Crew Wizard to install CrewNique:
- From the Kodi home screen, go to “Add-ons.”
- Navigate to “Program add-ons” and open “The Crew Wizard.”
- Select the “Builds” folder.
- Find and click on CrewNique.
- Choose between “Fresh Install” or “Standard Install.” A Fresh Install will reset Kodi to factory settings, which often results in a more stable build.
- Confirm your choice and wait for the build to download and install.
Setting Up CrewNique Build
When you first launch CrewNique, Kodi may take a few minutes to set up the new interface. The CrewNique build offers a horizontally arranged menu and a bottom cyclic submenu. Explore categories like Movies, Shows, Sports, and Live TV.
How to Integrate Real Debrid and Trakt with CrewNique
Setting Up Real Debrid:
- Go to “Apps > Video Add-ons.”
- Open “The Crew” addon.
- Click “Tools” and then “ResolveURL: Settings.”
- Select “Universal Resolvers 2 > (Re) Authorize My Account.”
- Note the authorization code, then visit real-debrid.com/device to authorize RD with this code.
Setting Up Trakt:
- Go to “Apps > Video Add-ons.”
- Open “The Crew” addon.
- Click “Tools” and then “Trakt Authorize.”
- Note the code and go to Trakt.tv/activate to authorize your account.
Keep Your Streaming Activities Private
Before you start streaming, remember that everything you watch on Kodi is visible to your ISP and the government. Using a VPN like ExpressVPN ensures your streaming activities are private and secure.
To Set Up ExpressVPN:
- Subscribe to ExpressVPN (30-day money-back guarantee included).
- Download and install the ExpressVPN app on your device.
- Connect to a VPN server.
Conclusion
With CrewNique, Kodi’s interface becomes more engaging, and you gain access to a host of useful addons. Ensure your streaming activities remain confidential and avoid potential legal issues by using a reliable VPN.
New Cloud-Based Streaming Device: What’s Your Take?